Nested virtualization with the ArchivistaBox
Egg, February 28, 2028: There are topics that are not new, but become more important over time. One of these topics is nested virtualization, also known as ‘Nested CPU’. This involves running multiple computers (i.e., Linux and Windows) on a single computer (i.e., ArchivistaBox) as conveniently as possible. This option has been available on the ArchivistaBox for more than 15 years. New in version 2026/II is ‘VirtBox’, which provides direct access, and ‘Nested CPU’, which enables nested virtualization at the touch of a button.
What is virtualization?
Nested virtualization can also be described as virtualization within virtualization. To clarify what this means, let’s briefly revisit the term virtualization itself. Today’s computers are extremely powerful, whether in terms of hard drive speed or processor (CPU) performance. The performance of modern hardware is more than sufficient to run multiple computers (operating systems) on a single device. Virtualization is simply the ability to run one computer virtually within another computer.
Virtual or virtualized means that the performance of a physical computer is divided among several guest operating systems (i.e., virtually). The ArchivistaBox uses KVM (Kernel-Based Virtualized Machine) technology. This technology works very efficiently because it makes direct use of the processor’s capabilities. The software (in this case, ArchivistaVM) is only used to access the resources.
What does nested virtualization mean?
If a computer only runs virtually as a box-in-box on another computer, the question arises as to whether this virtual computer can also use virtualization. In other words, the virtual operating system can itself “host” virtual guests. This is becoming increasingly important because operating systems now tend to pass on certain jobs or services to virtual “servants.”
For example, in Windows 10 and 11, it is possible to launch the so-called WSL (Windows Subsystem Linux), i.e., it is possible to start Linux as an operating system within Windows. However, if Windows is to run as a virtual guest under Linux, there is at least twofold (nested) virtualization. Windows runs in the first guest, and Linux (WSL) runs virtualized in this guest.

The new path with ArchivistaVM VirtBox
Until the beginning of 2020, there were two different versions of the ArchivistaBox: ArchivistaDMS and ArchivistaVM. For resource reasons, however, two separate distributions required significantly more development effort. In previous years, the hardware of the ArchivistaDMS systems often did not have sufficient performance for virtualization or ArchivistaVM.
With the expansion of ArchivistaDMS to include multimedia content, the hardware for ArchivistaDMS required much more power than was previously the case. Since 2020, virtually all of our ArchivistaBoxes have had enough power to run virtual guests on the same hardware.
When ArchivistaDMS and ArchivistaVM were merged, however, virtualization was very discreetly “placed” on the Home button. No one suspects that a server for virtualization is ‘hidden’ behind the Home button. That is why, starting with version 2026/II, there is now a new direct button, “VirtBox,” for easily accessing ArchivistaVM.
Nested instance with ArchivistaVM VirtBox
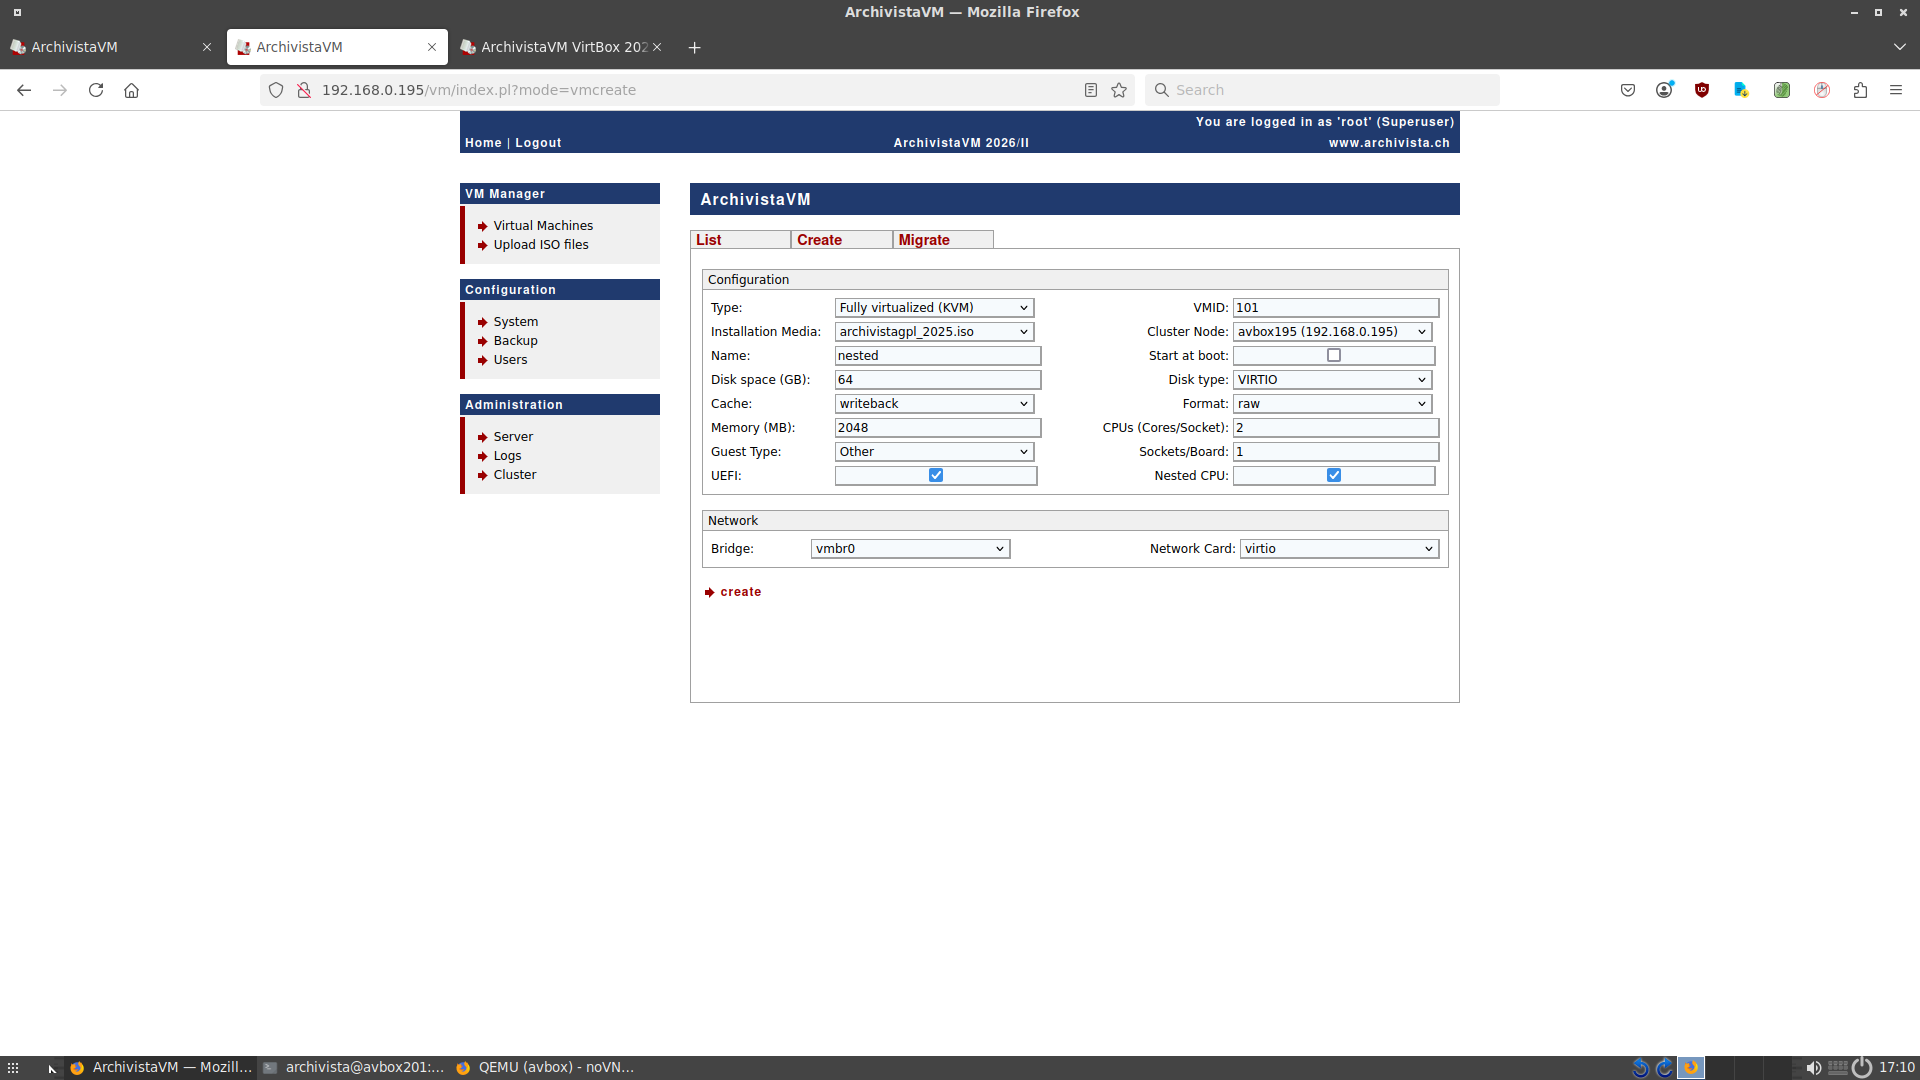
After logging into ArchivistaVM VirtBox, you can create a new instance by clicking on ‘Virtual Machines’ and ‘Create’:
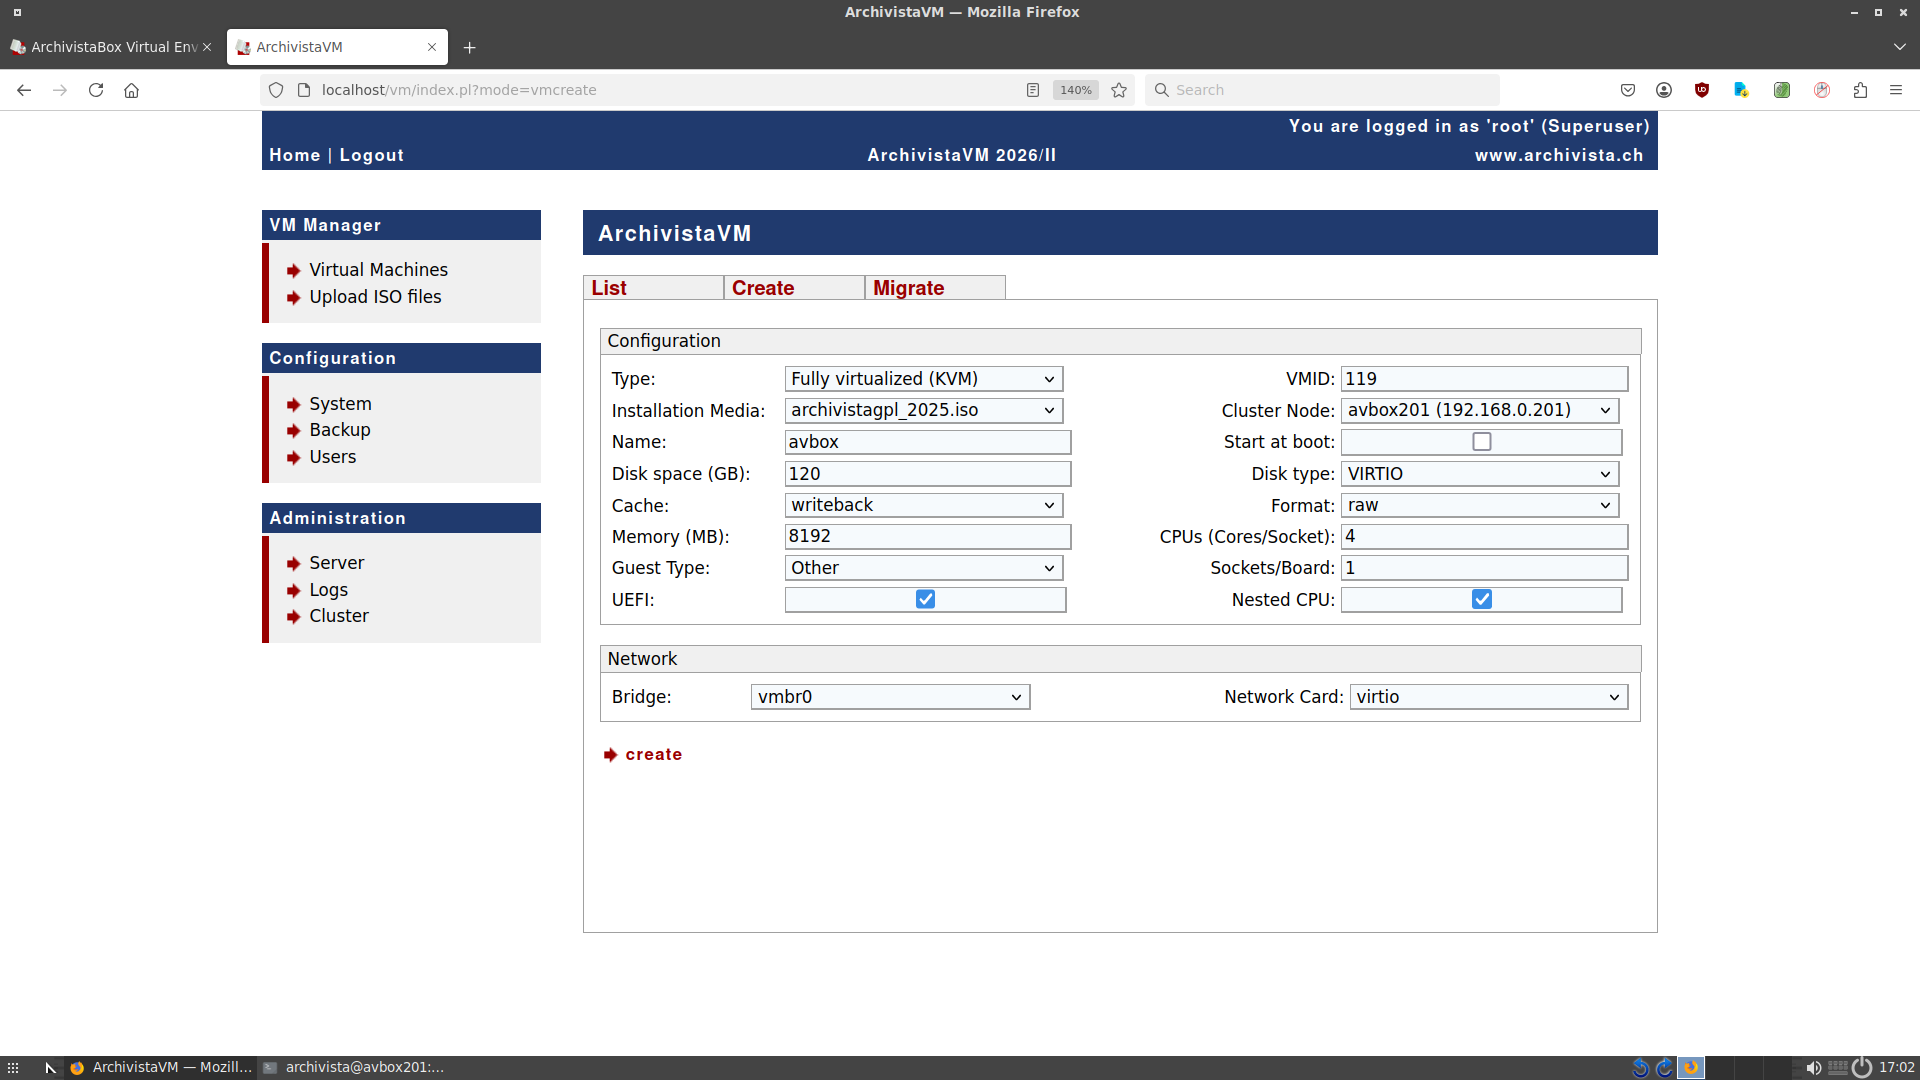
In this example, an ArchivistaBox is set up in the ArchivistaBox. In this virtual instance, another ArchivistaBox (nested CPU) is to be created.
First, we need to set up the parameters for our virtual instance. Since this instance will later “host” other instances, 8192 MB (8 GB) should be the minimum recommendation. ‘Virtio’ is used for hard disks and network cards; these drivers provide the best throughput. It is important that ‘Nested CPU’ is activated. After clicking ‘Create’ and ‘Start’, the instance is set up. Since the ArchivistaBox is extremely quick to set up, this process takes less than a minute. The first virtual instance is now available.
A newly set up ArchivistaBox is assigned an automatic IP address (DHCP). Since another virtual instance of the ArchivistaBox is now to be set up, the virtual instance must be assigned a fixed IP address. This is done via the start menu and ‘Network Tool’. After opening the tool, select the ‘Static’ tab. Enter the relevant information there:
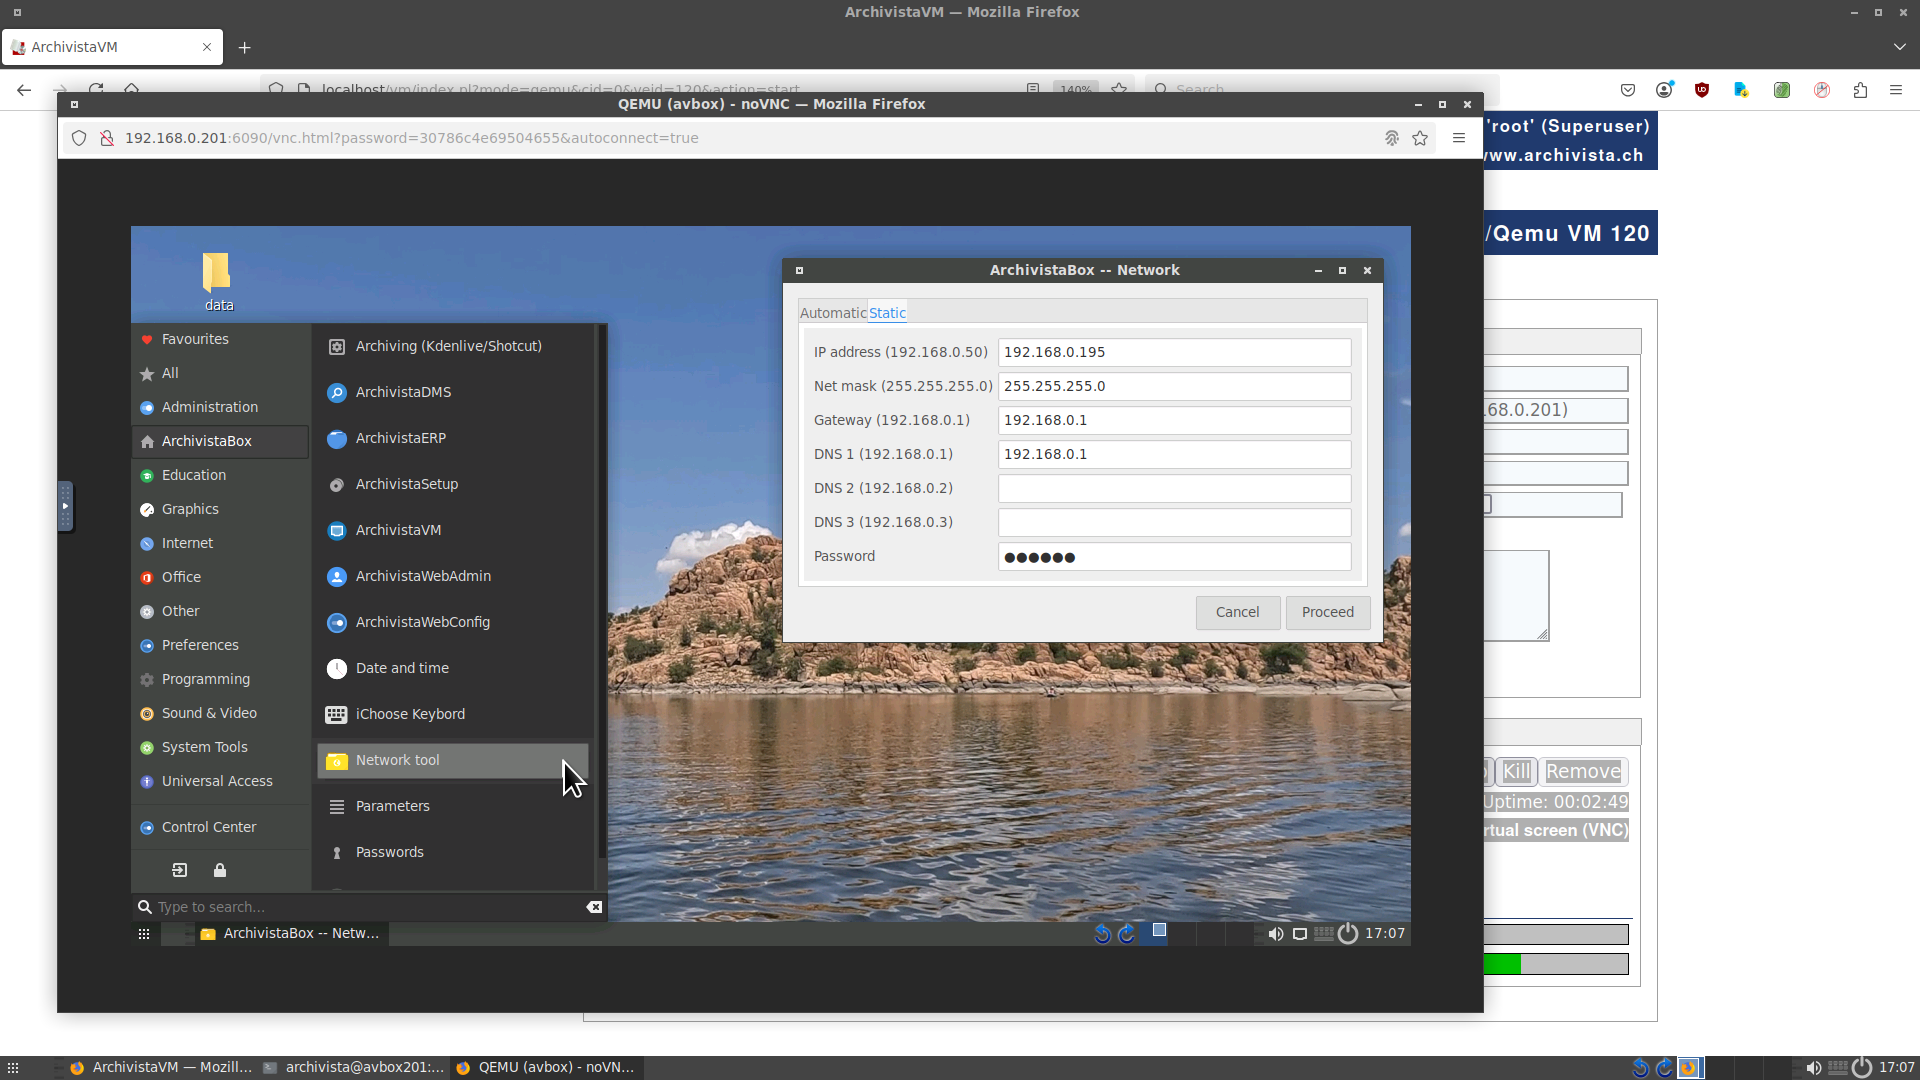
Confirm your entries by clicking ‘Execute’. If a confirmation message appears, your entries are correct. Our virtual instance can now be accessed at the corresponding IP address (in this case 192.168.0.195). Once again, log in to ArchivistaVM VirtBox.
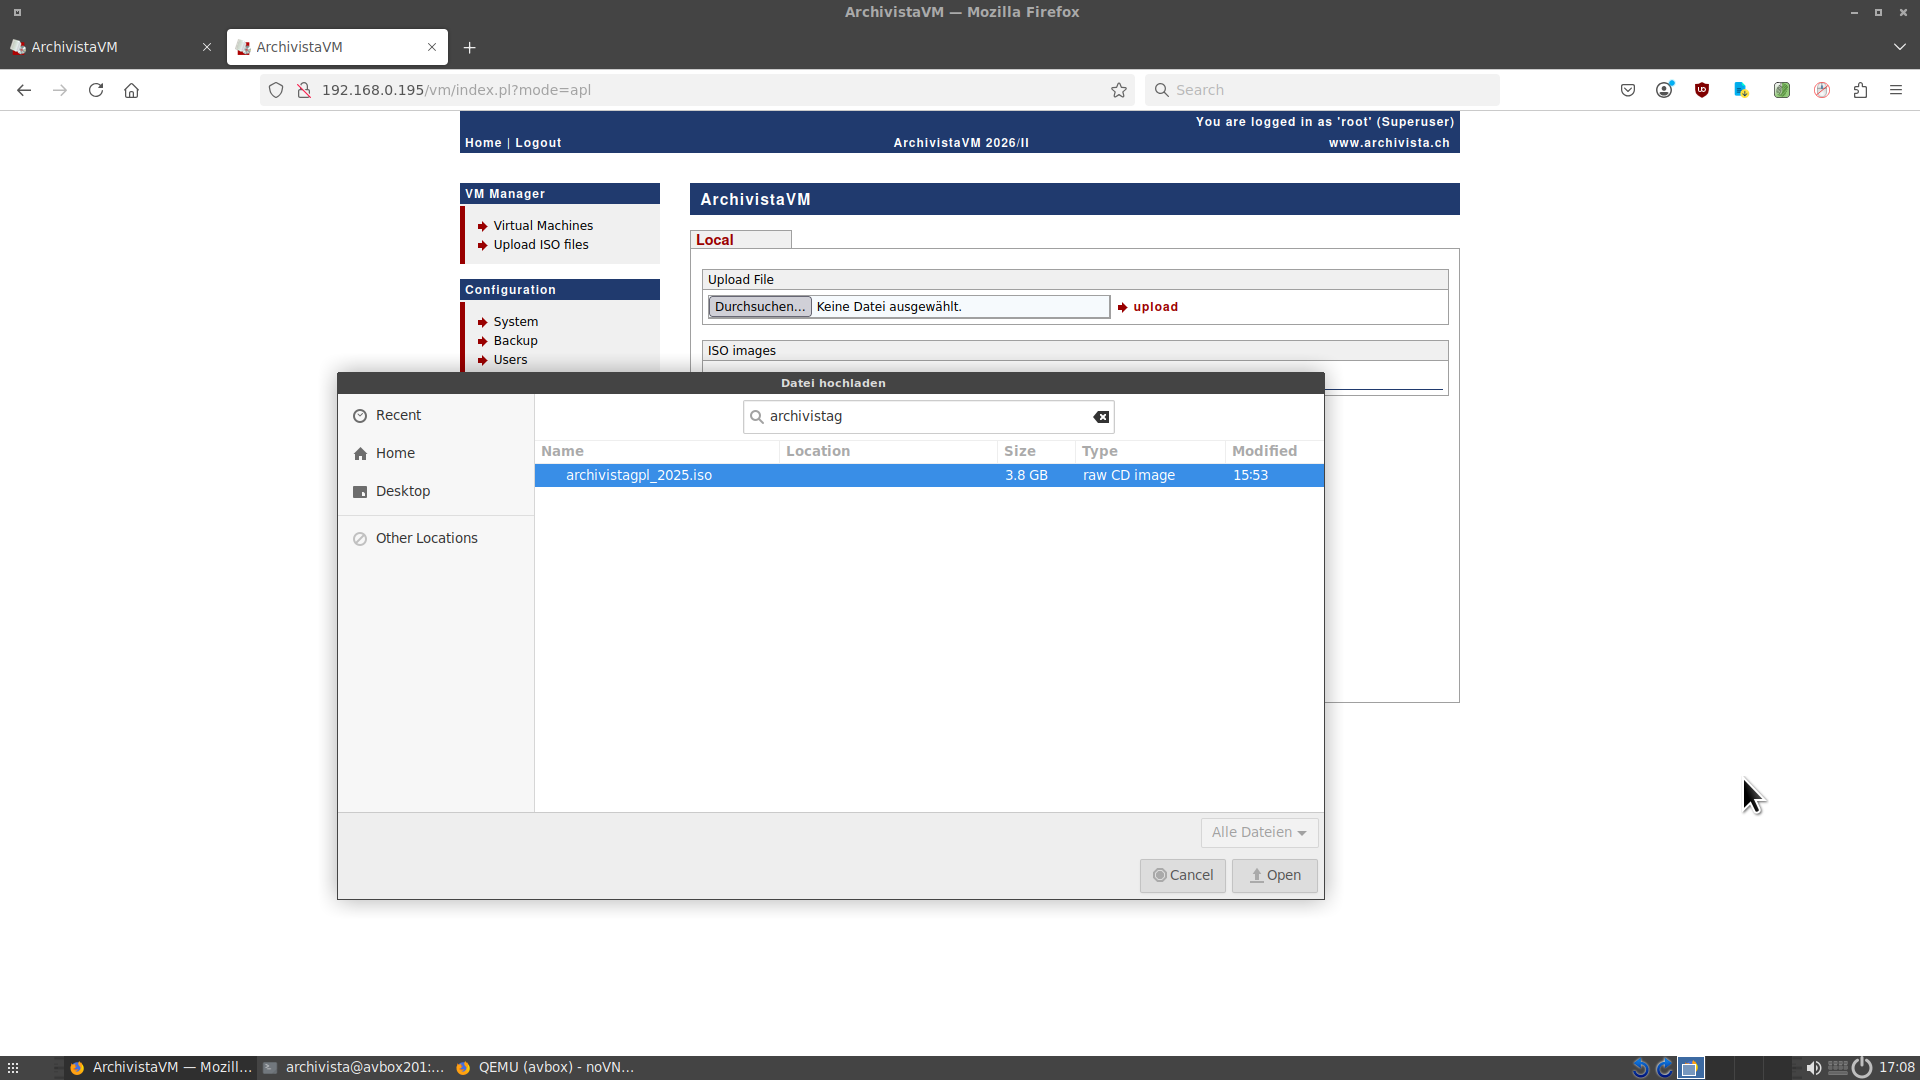
Since a nested instance is to be created in this virtual instance, the corresponding ISO file must be uploaded to the corresponding machine. This is done via ‘Upload ISO files’. The ISO file (here archivistagpl_2025.iso) is integrated via the ‘Upload’ button.
When creating the nested instance, make sure that less main memory, less hard disk space, and fewer CPU cores are allocated. The default settings can be used here. ‘Nested CPU’ is not mandatory, but can be activated so that the nested instance of the ArchivistaBox receives the complete instruction set of the processor. After clicking ‘Create’, click ‘Start’.
When booting up the nested instance, it can be observed that the process is not quite as smooth as with the first virtual instance. This is because all commands are executed via the existing virtual instance. Nevertheless, after a good minute, it can be seen that the nested instance is available.
Conclusion: Nested virtualization with VirtBox 2026/II is easy
ArchivistaVM VirtBox 2026/II not only offers a very simple platform for virtualizing machines, but it has also become much easier to pass on the virtualization functions (nested CPU) to the corresponding guests.
This functionality was already available, but the correct parameters (+svm for AMD, +vmx for Intel) had to be activated manually via the options. With the new ‘Nested CPU’ button, this is now very easy and efficient.
Finally, it should be noted that the example only works from version 2026/II onwards. In order for nested virtualization to be available, the corresponding driver must be activated when the ArchivistaBox is started. If this is not the case, nested virtualization cannot be used.
ArchivistaBox customers can obtain the new version via the update service. The ArchivistaBox AGPLv3 is available for free download here (password ‘av2013’):
https://archivista.ch/cms/agplv3
Note: ArchivistaVM VirtBox is just as powerful as other virtualization platforms (such as Proxmox, VirtualBox, HyperV, and/or others), but ArchivistaVM is significantly easier to use because the correct parameters can be managed clearly on a few straightforward forms.